Building a UV light source for alternative photographic processes

By the end of last year I took my first workshop on Platinum/Palladium and Kallitype printing. These closely related alternative photographic processes date back to the end of the 19th century, and both work by exposing a sensitised piece of paper and a negative to a source of ultraviolet light before they're developed and fixed in a set of solutions and then finally washed.
The chemistry and processes are fairly well documented elsewhere, such as The book of Alternative Photographic Processes, 3rd edition, however one of the key elements I knew I would need and that I want to document here was a good, even source of ultraviolet light to expose my prints.
As described in the excellent article by Sandy King, Pt/Pd and Kallitype are sensitive to a specific range of ultraviolet light which peaks around the 365 nanometres mark. Various sources of black light (BL) or black blue light (BLB) nicely fall into the suitable range and are relatively safe to be around so long as one takes the necessary care to protect the eyes with safety goggles.
Aa for the type of light source, I narrowed the options to using either traditional fluorescent tubes, or perhaps considering LED lights as described in this article. LED seemed like a superior approach, as they consume less and are simpler to wire, however the apparent problems of yellowing and thus degradation of the output, and the much increased cost of higher-quality 365nm LED strips made fluorescents the most viable option for me.

I started then designing the box around the maximum print size I wanted to be able to achieve, and more specifically the size of the print holder. I got myself one of these beautiful wooden contact print frames by Stenopeika in a very optimistic A3 size version.
There's several good options for UV fluorescents, like Philips BLB but at around 60 cm in length they seemed a bit large, but I found the perfect option in Sylvania's 15w BL fluorescents which are slightly over 40cm in length and nearly cover the printing frame.

Doing some maths and design in SketchUp, I figured I could pack 8 fluorescent tubes, with a distance of about 4cm between them on the desired area. I was also lucky to find the perfect wooden box on eBay to hold it all up, which makes for a self-contained unit with a lid I could even close, this way not leaking almost any UV light. I was a bit wary that the whole unit would heat up in an enclosed space, so I planned to add a silent fan that would move air around the two ballasts that are required to power the fluorescent tubes. Add a timed relay for accurate exposures, and a ton of wires to connect everything up, and the shopping list is as follows:
- 8x Sylvania F15W T8 BL 368 Toughcoat (Any-lamp)
- 2x Ballast (Any-lamp)
- 20x Bipin G13 holders £13.98 (ebay)
- XL Wood box 39x59x23 cm £26.19 shipped (ebay)
- Inkbird Digital Twin Timer Delay Relay Switch (Amazon)
- 25 metres of 1,5mm single-core wire.
- wire connectors (Amazon)
- 3 metres 3 core electrical wire £8.97
- 1 UK plug fused for 13 amps £2.40
- wire splice T connectors £4.92
- 80 mm Fan Cooling Device (Amazon)
- LEDSOne AC 110V-220V to DC 12V transformer (for fan) (Amazon)
The total cost, considering shipping came at about £255.
-
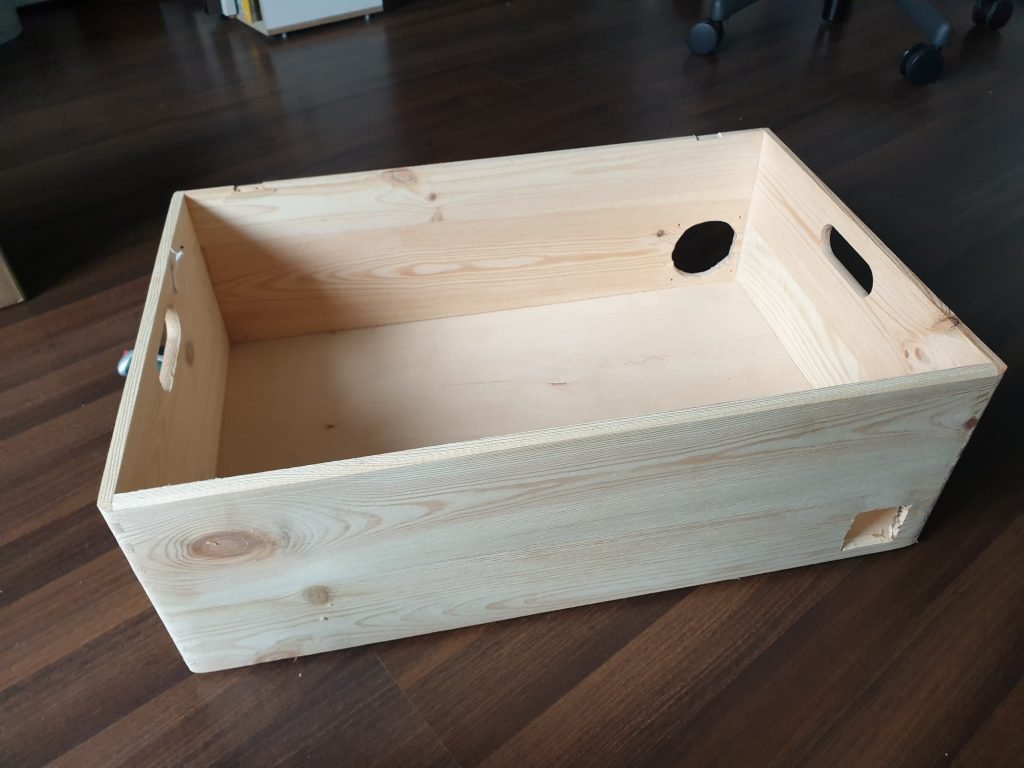
box with drilled holes for fan and timer -

Timer relay -

80mm computer fan -
design showing the components -

section of the design
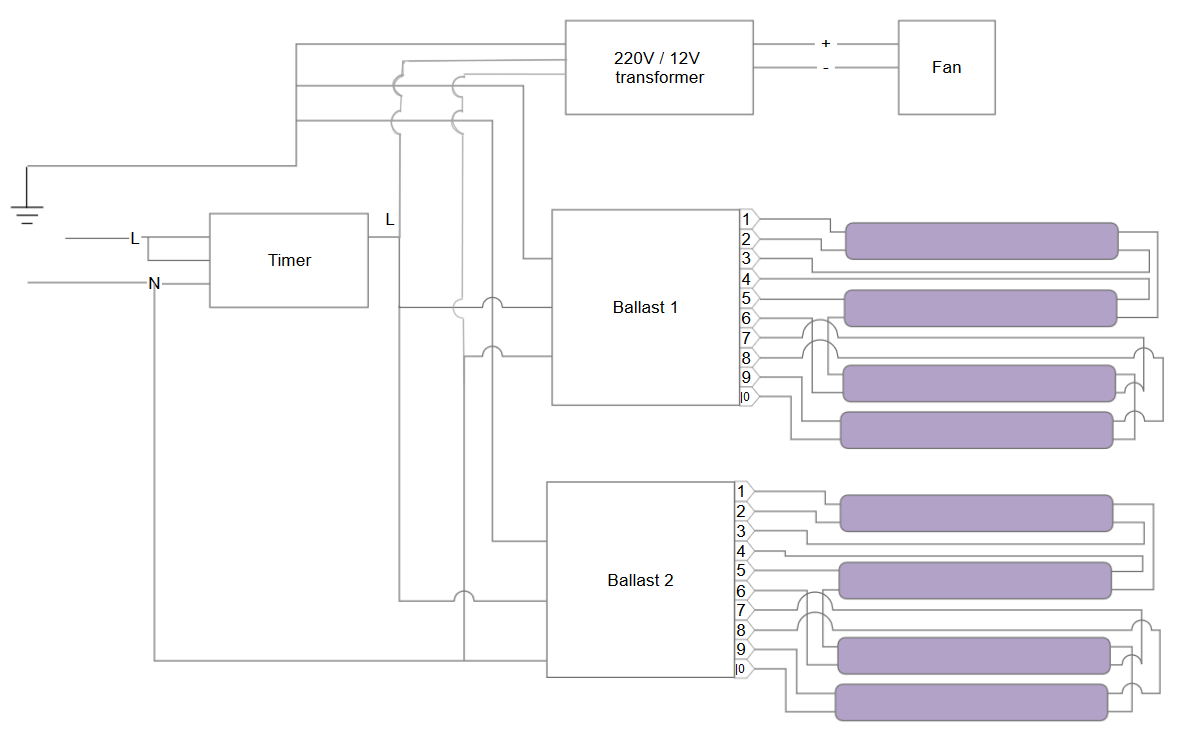
Next came wiring all up, and this I have to say was my least favourite part considering the amount of connections that one needed to get right. The setup overview is as follows: the main AC power is routed via the timer, and split three-way: first to feed a 220V to 12V DC transformer, which in turn powers the fan. Secondly, to two identical sub-circuits which involve a ballast powering 4 fluorescent tubes each.
The relay timer, from a Chinese manufacturer, came with no inteligible instructions whatsoever, but sobre Googling took me to this set of diagrams which allowed me to figure out the wiring. The rest of the fun was the painstaking routing of the 20 wires required to connect the ballasts to the fluorescent tubes via 16 bipin connectors screwed onto the inner side of the box. This I had to do twice actually, after finding out that I needed to employ thick 1,5mm² single core wires rather than twisted multi core, which wouldn't be properly grabbed by the ballast connections.
I am no electrician by any stretch of imagination, and I went into this project armed with a voltimetre, a screwdriver and the knowledge that enthusiastic doses of electrical currents can be unhealthy. I managed however to get it all to work eventually, after no small amounts of cursing loose cables. The result is amateurish, but it works! and accomplishes the requirements of being tidy, self-contained, and accurate down to the second.
After all this DIY nerding, how does this bad boy perform?

I carried out a Pt/Pd calibration test where I sensitised a piece of cotton paper with a solution of 6 drops of Ferric Oxalate, 6 drops of Palladium #3 solution from Bostick and Sullivan, and 2 drops of Na2 (5%). Then covered half of the paper with a blank sheet of Pictorico film. Next I made a test strip with exposures from 30 seconds to 5 minutes, in 30 seconds increment. I wish I had carried on for a bit longer, but once developed and after the dry-down, the blacks seem to saturate at around the 5 minute mark. Not too shabby!
Here's a video of the light in action cycling on and off on 10 second intervals.
In hindsight I might have been able to simplify the setup by removing the fan, as I don't find the lights get very hot: I let the unit run for about 15 minutes with a termometer inside the box, and the temperature stayed at a moderate 30 degrees celsius. But then again, better safe than sorry!

This is just the very beginning of my journey in Pt/Pd printing. I need to repeat the calibration test for the Kallitype process, followed by further testing in order to create a response curve for my negatives, and then perhaps an extra decade of perfecting the myriad of details one needs to get right. I am really excited, and I hope this blog post was interesting and perhaps useful to someone looking to follow a similar path!